
Most of the hive bodies that I use are deeps (9 5/8" tall). The deeps are much heavier when full of honey than my shallow supers are when they are full. The extra amount of pressure used to pry them apart with my hive tool also helps to damage them. After they have been in the weather for a few years the corners where you pry them apart degrade due to the weather so it becomes easier to damage them when prying them apart.
A few years ago I went to a hive body rotation schedule due to having older hive bodies which needed repaired or restored. During the winter months I will repair and restore some of the older hive bodies to rotate out with those currently in use. I like to switch them out in the spring when I start to routinely inspect my colonies. The ones which get rotated out will soon be restored or repaired with a fresh coat of primer and paint to be put back into rotation when needed. After I am finished with the rotation the last ones will usually sit around until January at which point I will start getting anxious and start the process again. The winter months are also an excellent time to buy all that new woodenware you need for the spring.
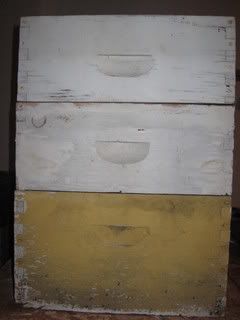
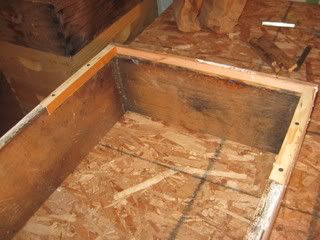
I am sure that some of you have seen hive bodies that look like this.

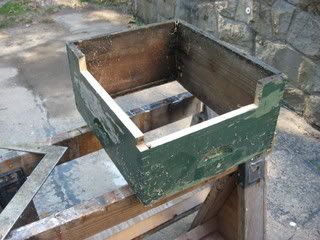
Sometimes when I have a hive body like this I will cut them down to a medium super (6 5/8" tall). That is the easiest thing to do. The only bad thing is that you either have to cut down some frames to fit it or just buy some new ones. You can see at the bottom left, or a top corner, of the hive body that it needs to be repaired there as well as on the bottom,
Over the hive body previously pictured you can see two deeps which were cut down to mediums. Notice the three different styles of cut in handles. These three hive bodies each came from different suppliers.
This next picture is of a hive body which I simply just cut some rotten spots out of. It's easiest to me if I cut from where the joints meet in the corners and I only try to cut a minimum of wood to remove the rot. It is important to keep your cut square so when you attach the new wood to the hive body it fits properly.
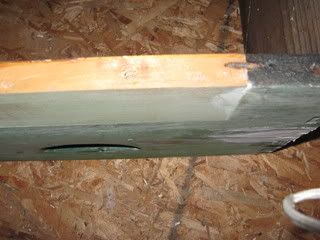
This picture is of the same hive body with the new wood in place. I prefer to use a bead of carpenter's glue between the new and old wood but it is not necessary.

The other end of the hive body had some rot too. Since it was near the center of the hive body I chose to use some exterior vinyl spackling by DAP. I have used bondo before but the DAP is easier to use as it requires no mixing and is easier to sand. The reason the paint looks so bad is because it was an oil oil based paint instead of latex paint which is water based. I'll discuss the paint in more detail a little later.
It's hard to see in this picture but there is a predrilled hole into which a 3" decking screw was used to fasten the new wood to the hive body. For thinner pieces of wood used to replace rot I like to use 16d or galvanized spiral nail instead of the countersunk screws. I also favor using electrical 3/4" metal staples for securing the bottoms together to help hold them flush when screwing or stapling. After removing the paint I discovered another rotten spot. You can see where I used a chisel to remove the rot and where the DAP was used about half way down the right side of the hive body.
The next picture is of a hive body with one of the top ends repaired. There was not much damage on the top of this deep hive body but I felt the bottom was in such disrepair that it needed to be cut down to a medium super. The end had been cracked off from using it as a fulcrum to pry propolised frames from the hive body over the years. The corners were rotted and damaged as well from all the prying. Since these pieces of wood that were used are small so are the nails. A good bead of glue was applied before nailing and the glue will hold better than the nails would otherwise.
I have not painted any of the hive bodies that I have repaired because I am making and ordering more woodenware and wish to paint everything at the same time. When I paint hive bodies I prefer to use two coats of primer. My primer of choice is Kilz2 latex primer. It is a latex sealer, primer, and a stainblocker. It is also water based so cleanup only requires soap and water. It dries quickly and can be recoated in about an hour. The primer helps the paint last longer as well as it gives the paint a prepared surface suitable for painting. If you don't use primer your paint will chip off the unprepared wood in a year or two and your wood will not be properly protected from the elements.
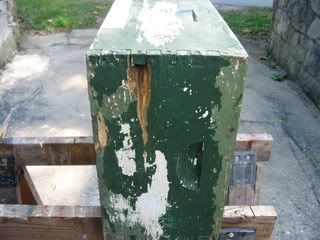
For the paint I prefer latex. The color is not as important as what kind of paint you use. Be sure to use a water based latex exterior paint. When choosing your paint try to choose some that is mildew resistant and with a good warranty. Some people my disagree and think that oil based paint is better. However I do not share these views. Remember the green hive body above with the chipped paint? Would you like to know why it was like that? Wood is a permeable substance. This means that the wood breathes or will allow moisture to pass through it. The oil based paint creates a barrier that will not allow the wood to breath. When a strong colony of bees is curing nectar into into honey the permeable quality of is a benefit and this is one of the reasons I don't like styrofoam hives. When the moisture from the nectar tries to escape through the wood it will be trapped in behind the oil based paint. (I doubt if whiskey would be as good as it is if the charred barrels that it ages it in were painted with an oil based paint. A big part of aging whiskey in a charred barrel is that the wood breathes and allows the flavor to build during the aging process.) After a while the wood will start rotting behind the paint because it is coming from the inside. This is why I now only use latex paint because it is permeable and allows the wood to breath properly. When restoring hive bodies which have been painted with an oil based paint I use a heat gun to help strip as much of the old paint off as I can. It blisters the paint for easy scraping and removal and is much faster than sanding because the oil based paint is pretty tough stuff. If the hive bodies are properly primed and sealed before painting usually all I have to do is a little sanding just to scratch the paint up some and recoat with a fresh paint when I restore them.
Before painting there is another step that I include in my hive body rotation. Before priming and painting I will scrape the inside of the hive body. Then the inside is lightly scorched with a propane torch. After this it is then sanded until the scorching is barely visible. Though I have never had any AFB or nosema in any of my colonies for the ten years I've been keeping bees I do this as an extra precaution to help guard against spreading any possible disease that could be hiding in the propolis, burr comb, or on the wood.
I hope you enjoyed reading this and hopefully learned something to help you become a better beekeeper. When I am ready to get everything painted I'll be sure to take some pictures and to share the experience with you. Thanks for reading.
3 comments:
Keep up the good work. Your posts clearly speak from experience which I shall value once the season gets started again. I hope you'll do a post on re-queening and also on increasing colonies (hives).
Thanks for the tutorial. I am also looking forward to your thoughts on re-queening and splits.
In regard to wood repair, I have been using my narrow crown air stapler (from Harbor Freight) to attach new wood. It works great.
Thank you so much for this information. I am a new beekeeper and I inherited some old hives that needed some love to make them functional. I have scoured the insides with vinegar and salt water then I torched the insides to make sure they were totally ready for my new bees. As some of them were good but others had been sitting out in the weather for a while empty and exposed some of the pieces were rotted or damaged. I am so happy to have a way to salvage them. Thanks again for your post.
Post a Comment