
One of the big things about collecting swarms, removing bees, doing cutouts, or colony extractions is that you may inadvertently introduce a new pest or disease to your apiary. I collected a swarm while working near Carbo, VA a few years back and brought it home. The colony did great. I had no reason to suspect it had anything wrong with it. After I sent some samples to the Beltsville Bee Lab last Autumn I discovered this colony had tracheal mites. It had not infected my other colonies but the potential was there. Having a call about a swarm here in southern West Virginia is not common but having calls for doing colony extractions are.
Prior to doing the cutout you should asses the site and collect some samples to send to the Beltsville Bee Lab to have the sample diagnosed. After you get the results back you can decide what you need to do to the colony after you extract it. While you are cutting out the brood comb be sure to examine it closely for any brood disease. If you don't see any signs you should be alright. But if you see something out of the ordinary send it in for testing.
Here are some pictures from a colony extraction I did last May in the county east of here. The first picture is of me getting set up to look into the colony entrance.


After looking into the entrance and listening to the humm of the colony I was glad to discover the colony was in the wall on the front of the building and not on the side. This was a great relief as I did not wish to work off of the rickety extension ladder I had. Since the colony was in the front wall it made the work of removing it much easier as I could work off of the front porch on a step ladder.

After removing in the asphalt siding in a manner in which it could be reused I proceeded to cut the wall panels up the center of the stud so the could easily be nailed back into place. Pictured below is my first good look at the colony after I removed the planking from the wall.

After smoking the bees to move them to the comb deeper in the colony I started the slow tedious process of cutting the brood comb to fit some deep catch frames. I removed my gloves while doing this. Manual dexterity is of utmost importance when cutting out comb. I only got stung six times during the entire time and was all my fault because I put my hand or fingers on a bee. The bees were very docile which relieved my anxiety of possibly getting stuck like a pincushion.

Here I am coming down the ladder with a deep catch frame full of brood to put into a deep hive body.


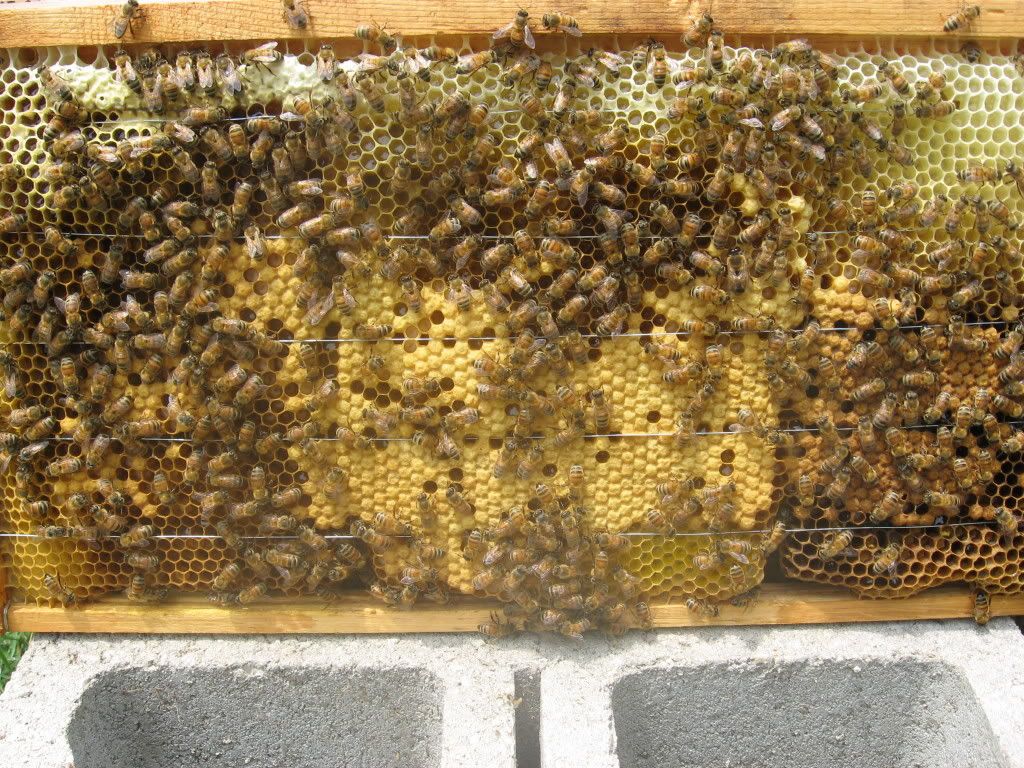
Here's nice picture of a swarm catch frame partially filled with brood comb. You can see where I have removed about half of the comb from the wall at this point and there are still a bunch of bees in the wall.

At this point during the cutout I discovered the colony was making swarm preparations. This was evident by the presence of two swarm cells which were uncapped and still under construction. If I would have waited a week later I would have lost the mated feral queen and half of the bees in a swarm. The swarm cells were later used to make some nucs.


There was a lot of brood in the colony. If I remember correctly I made up eight frames of nothing but brood during the cutout.


This is a picture of the piece of comb I cut out that had the queen on it. The five gallon bucket in the background is where I put all the honey comb. It was nearly full when I finished.

Here's a closeup of the queen. It looks as if she was slimming down to fly off with the swarm within the next couple of weeks.

One thing that excited me about these bees was how quickly they started to remove damaged larva from the comb and hive after I put the comb into the deep hive body. This is indicative of hygienic behavior and was confirmed later when I tested them for hygienic behavior.

It took about five or six hours to remove all the comb from the wall and another two hours to remove and reinstall the sheeting and siding on the wall.

After a little more scraping of burr comb and removal of straggling bees I fixed the wall back to original condition. Too bad my photographer was in cleanup mode and forgot all about taking some additional pictures when I was done. I took all the bees I could and waited until after dark to make sure that I did. I feel sorry for the bees that got left behind but seeing how they were old enough to be foragers they didn't have much longer to live anyway.
I monitored the progress of this colony closely over the rest of the Summer and and it did not take them long to repair what I damaged. This picture was taken about two weeks later.
This next picture is what the upper deep looked like on the colony before winter. I was also fortunate to have this colony make a super of honey which I gave to a weaker colony for the winter.

This picture is of the winter cluster as of January 6, 2008. You can see that the colony only has three of the catch frames left in it because I used the rest for the split that I transferred the queen cells into. That split was later divided and the colonies that resulted are overwintering well so far. You can see in the picture that I used nine frame space frame rests in the hive body. This helps to hold the frames together until they are propolised and eliminates the need to use rubber bands or tie the ends of the top bars together. As of January 6th the bees had not moved into the upper deep and it is still full of winter stores.

If you are interested in doing any cutouts and would like some swarm catch frames feel free to contact me at my email address; ccohenour@hotmail.com
Also, if you are in southern or central West Virginia or near the state line around the area and have a colony you need removed from your property please feel free to contact me as well.
I have a few colony extractions scheduled for the later half of May. Hopefully I'll be able to take some pictures of those as well and post them here for you. If you are doing a cutout on your own just be sure to take plenty of beekeeping equipment, tools, take your time, and be careful. I hope you have enjoyed this. Happy Beekeeping!!!