
I recently received an email from a lady who hooked me up on a colony extraction job last summer. I thought that I would share the query and reply with those who wish to read about it.
Subject: bees
Date: Wed, 31 Dec 2008 13:13:30 -0500
From: *****@****.com
To: wvbeekeeper@gmail.com
Hello Cass,
I got you the bees from Arbuckle Creek in Mason/Putnam Co. I was just wandering how they are. Did they survive?
Karen,
Thank you for contacting me so I could remove the colony there at Arbuckle Creek. It was a pleasure and a joy to meet your family. (If I remember correctly, that was your family, right?) The colony was an easy one to remove. I have had some colonies which required up to two weeks to remove. This includes restoring everything which needed to be removed in order to gain access to the colony. I did find the queen. She was a pretty one. Unfortunately for me, the queen did not have the superior genetics which I am looking for in my bees and one of the major reasons I perform colony extractions for individuals. The bees within the colony had varroa mites, an abundant amount, IMHO, based upon a visual inspection while removing the colony and after setting the colony up in my bee yard which is specifi9cally designed to hold colonies in quarentine until all proper health inspections are achieved. This colony was in such poor health when I extracted it, (I suspect insecticide had been administered to the colony though that accusation was enthusiastically denied), I attempted to requeen it with one of the queens that I had reared last season. I believe the colony would have been just fine but the degree of varroa infestation was overwhelming to the small number of bees which were removed and relocated. The colony perished. This was one of two colonies I removed last season which had wax that was heavily contaminated with insecticide and also a healthy population of mites. I personally believe that if this colony would have been left alone it would have died out not long after I removed it. However, I am glad to have performed the service for you and gave me additional experience at removing unwanted colonies. Thank you again, and if you have any additional questions please contact me anytime.
Thanks again and Happy New Year!!!!
Cass Cohenour
Should you ever need bees from a structure on or near your property, please do not spray the bees with Raid, Ortho, or any other insecticide. Go through the proper channels in your state or area to find who is willing to remove the bees for you. There is a few sites on the web which will give you the name of beekeepers local to your area who are willing to perform extractions for a fee. I will in the future charge more for my service the bees have been sprayed, possibly twice as much, for the bees are no longer any count to anyone once their wax is contaminated. During the upcoming Spring, and swarm season, if you can not find the proper channels to go through to find someone to remove bees in your area, please contact me and I can
probably find you someone to help.
HAPPY 2009!!!!!!
-CASS COHENOUR, aka WVBEEKEEPER
Showing posts with label bee removal. Show all posts
Showing posts with label bee removal. Show all posts
Thursday, January 1, 2009


Saturday, April 5, 2008
Colony Extraction From Within a House
I received a call a while back about removing some bees from a House. The lady said that they had been there for a while, about three or four years.She also said that she had tried to get several different beekeepers to get the bees but no one wanted to do it because the bees were in the chimney. Since I'm always up for a challenge, have good carpentry skills, and love honey bees I decided to do the job for her.
Since the dandelions started blooming here recently I decided to go ahead and remove the colony before it became too populous.

I took a day and drove out to her house, which is in Huntington, WV and almost two hours from where I live, to take a look at the situation and size up the job. This is a picture of where the bees were entering their nest.

In the next picture you can see the crack where their entrance was and if you enlarge the image by clicking on it you can see the propolis they used to seal some of the crack to help weatherproof their nest.

After I found the entrance I put up a ladder to go take a look into the entrance. I couldn't see into the entrance very well so I had to remove some of the siding. After I removed some siding to get a better look I could see that the bees were in the wall and not in the chimney. They were actually in the wall to the inside of the chimney. The only way I could extract this colony was to do it from the inside. So I put the siding back up and left the job site to go and prepare for doing the cutout from the inside the next day.
When I returned the following day on March 31, 2008, I had to get everything set up. After removing the baseboard, crown molding, window trim, and the trim from around the fireplace I laid a sheet of plastic on the floor and used tape around the edges to help hold the plastic in place.


After getting the plastic on the floor properly in place and secured I then made a temporary wall of plastic parallel to the chimney wall by taping a sheet to the sealing and to both walls on the end.

You can kinda see the door in the picture above. You can also kinda see it in the picture below. I overlapped the almost four foot to allow myself a way to get in and out of the extraction area. I taped about two feet of the top of the seam so bees couldn't get through at the top. I also used tape along the edge of the plastic so the bees couldn't get out. It was very important that the bees not escape because the woman who lived in the house was allergic to bees and didn't have an epipen.

After getting the area secure I then moved my equipment into the extraction area. I took one deep hive body with bottom board to put the bees in. I also use a nine space frame rest. Using only nine frames helps because of the irregular nature in which bees will draw their nest naturally. I have found that the extra room is essential when putting the wavy comb into the split catch frames I use. I also have a couple sprayers for spraying sugar syrup on the bees. I didn't want to use my smoker inside the house and it makes it really difficult for them to fly when they are covered in syrup. They stay on the comb and it is easier to transfer them into the hive body when you cut the brood comb. I also have a five gallon bucket of water and some towels to keep my hands clean. There is another five gallon bucket for holding the honey comb.

Since all of my equipment was in place it was time to remove the paneling. I was told that there was noting under the paneling but I soon found out that there was furring strips over plaster and lath. In the picture below you can see some honey comb was built between the space created by the furring strips and paneling.


After removing the honeycomb I proceeded to remove the plaster and lath to expose the colony.

In the next picture you can see the light coming in from the gap between the chimney and wall. This is where the bees made their entrance. The brood nest is in the center cavity. The cavity on each side of the brood nest is honeycomb. There was enough honey comb to nearly fill a five gallon bucket.

After exposing the colony I decided it was best to remove the old brood comb and inspect it as I placed it into a garbage bag.

As I was inspecting the comb I found some suspicious looking brood which had not emerged. I examined it closely for scale due to the sunken cappings. I also stuck a splinter in one of the capped cells to see if the remains of the pupa could be drawn into a rope. It was not ropy. As I was talking to the homeowner about the possibility of the colony having a brood disease, such as American Foul Brood, and might have to be destroyed by burning she then informed me to the fact that the colony had been sprayed with poison last summer by the boy who mows the lawn. She also told me that the colony had been sprayed with some poison three years ago as well. Even though it eased my mind about the colony having brood disease I still sent a few samples to the Beltsville Bee Lab for AFB testing. The picture below is of the suspicious looking brood which was sent for testing.

After talking a little more about when the bees were sprayed the last time she told me that they used a whole can of spray and sprayed into the entrance of the nest. I doubt that the bees have a brood disease due to the fact that the residue of the insecticide could kill brood for a a long time after first being applied. I thought it was still best to send samples to Beltsville just to ease my mind and to be a safe and responsible beekeeper. Please do not ever poison any honeybees. Find an experienced beekeeper to help you out should you ever have a colony take up residence at your residence.
I did find the queen. She looks a lot like a Carniolan. There was not much brood or bees in the colony so she was easy to find. The pictures I have are really blurry so I will take a picture of her later and post it. But until then, here is a blurry picture of her.

After getting her and her colony home I gave them some new drawn comb to start on. I took only the minimum amount of brood comb from their nest due to the poisoning. I will rotate these frames to the outside of the hive and cull them out eventually. Even Though I am still awaiting the test results from Beltsville, I added some bees to the colony to help them become better established at their new location. Pictured below is a frame with some honeycomb and a couple pieces of brood comb. I made up one mere frame like this with a little more brood comb and less honey. I then either put the rest of the comb in the honey bucket or in the garbage bag.

Here is a picture of the wall after all the comb was removed.

The bees had built up into th wall an additional eight inches which made it a little more difficult to remove the comb and bees from there. This picture was taken looking up into the wall.

This was the first time that I lit up my smoker. I smoked the bees in this recess a whole lot. I smoked them enough so that they either fell out of the recess or took flight. The bees that fell were brushed into an empty butter bowl and dumped into the hive body. The bees which took flight went to the windows, toward the light, and were easily brushed off the top of the window into a butter bowl and then dumped into the hive body. After capturing all of the bees I sealed up the hive body with screen on the entrance, screen on the ventilation hole of the inner cover, and taped the inner cover to the hive body. wedges from a wedged top bar work really well to hold the screen in place and is easily removed. I must say it is much easier to use the and remove the wedges than it is to staple the screen on the entrance.
I do believe that above the top plate of the wall, in the previous picture, that the colony had moved up above it to build a new brood nest due to the fact that the lower area had been poisoned. I would have had to remove the ceiling and another ceiling above that tho gain access to this area. This was an extra expense the homeowner did not wish to incur. I could here bees buzzing in the wall above where I removed the honey comb and brood nest. If there is eggs or larvae of the appropriate age above the top plate the remaining bees can make a new queen and will continue to live in the wall. I informed the homeowner of the possibility of this occurring and agreed to come back and trap the bees out if this happens. I told her to wait a month to see if the bees were still there. If I was just hearing some stragglers buzzing chances are they will go find another hive to join or they will die alone.

All that was left to do was to clean the area and then reinstall the trim and paneling.

Here is a picture of the wall after everything was cleaned and put back into place.

You can't even tell that I had been there when the job was done. Performing a colony extraction from inside of a house or building is easily done if you are prepared and have some skills as a carpenter. Using plastic on the floor helps to keep honey and debris from embedding into the carpet fiber. Also sealing up the plastic really well along all the seams and edges will keep the bees out of the rest of the house. Be sure to have a shop vac, or a bee vac, on hand to capture all the stragglers which you couldn't put into the hive body before taking down the containment tent.
I hope this helps any of you who may be considering performing a colony extraction from inside of a house or other structure. Also, if you have bees in your house please do not poison them. Contact someone qualified to remove them for you. If you would happen to get lucky and kill them with poison, which is doubtful, the honey wax will melt and honey will drip down the inside of your walls and seep out into your carpet. You'll most likely never be able to get rid of the ants and other insects that will move in when the find the honey. Also if you spray poison on them most beekeepers will not remove the bees for you or will charge twice as much if they do. I doubt very seriously if I would have removed these bees if I would have known that they had been poisoned. When sprayed with insecticide, the honey is not fit for human consumption and the wax can not be utilized for beekeeping.
Since the dandelions started blooming here recently I decided to go ahead and remove the colony before it became too populous.

I took a day and drove out to her house, which is in Huntington, WV and almost two hours from where I live, to take a look at the situation and size up the job. This is a picture of where the bees were entering their nest.

In the next picture you can see the crack where their entrance was and if you enlarge the image by clicking on it you can see the propolis they used to seal some of the crack to help weatherproof their nest.

After I found the entrance I put up a ladder to go take a look into the entrance. I couldn't see into the entrance very well so I had to remove some of the siding. After I removed some siding to get a better look I could see that the bees were in the wall and not in the chimney. They were actually in the wall to the inside of the chimney. The only way I could extract this colony was to do it from the inside. So I put the siding back up and left the job site to go and prepare for doing the cutout from the inside the next day.
When I returned the following day on March 31, 2008, I had to get everything set up. After removing the baseboard, crown molding, window trim, and the trim from around the fireplace I laid a sheet of plastic on the floor and used tape around the edges to help hold the plastic in place.


After getting the plastic on the floor properly in place and secured I then made a temporary wall of plastic parallel to the chimney wall by taping a sheet to the sealing and to both walls on the end.

You can kinda see the door in the picture above. You can also kinda see it in the picture below. I overlapped the almost four foot to allow myself a way to get in and out of the extraction area. I taped about two feet of the top of the seam so bees couldn't get through at the top. I also used tape along the edge of the plastic so the bees couldn't get out. It was very important that the bees not escape because the woman who lived in the house was allergic to bees and didn't have an epipen.

After getting the area secure I then moved my equipment into the extraction area. I took one deep hive body with bottom board to put the bees in. I also use a nine space frame rest. Using only nine frames helps because of the irregular nature in which bees will draw their nest naturally. I have found that the extra room is essential when putting the wavy comb into the split catch frames I use. I also have a couple sprayers for spraying sugar syrup on the bees. I didn't want to use my smoker inside the house and it makes it really difficult for them to fly when they are covered in syrup. They stay on the comb and it is easier to transfer them into the hive body when you cut the brood comb. I also have a five gallon bucket of water and some towels to keep my hands clean. There is another five gallon bucket for holding the honey comb.

Since all of my equipment was in place it was time to remove the paneling. I was told that there was noting under the paneling but I soon found out that there was furring strips over plaster and lath. In the picture below you can see some honey comb was built between the space created by the furring strips and paneling.


After removing the honeycomb I proceeded to remove the plaster and lath to expose the colony.

In the next picture you can see the light coming in from the gap between the chimney and wall. This is where the bees made their entrance. The brood nest is in the center cavity. The cavity on each side of the brood nest is honeycomb. There was enough honey comb to nearly fill a five gallon bucket.

After exposing the colony I decided it was best to remove the old brood comb and inspect it as I placed it into a garbage bag.

As I was inspecting the comb I found some suspicious looking brood which had not emerged. I examined it closely for scale due to the sunken cappings. I also stuck a splinter in one of the capped cells to see if the remains of the pupa could be drawn into a rope. It was not ropy. As I was talking to the homeowner about the possibility of the colony having a brood disease, such as American Foul Brood, and might have to be destroyed by burning she then informed me to the fact that the colony had been sprayed with poison last summer by the boy who mows the lawn. She also told me that the colony had been sprayed with some poison three years ago as well. Even though it eased my mind about the colony having brood disease I still sent a few samples to the Beltsville Bee Lab for AFB testing. The picture below is of the suspicious looking brood which was sent for testing.

After talking a little more about when the bees were sprayed the last time she told me that they used a whole can of spray and sprayed into the entrance of the nest. I doubt that the bees have a brood disease due to the fact that the residue of the insecticide could kill brood for a a long time after first being applied. I thought it was still best to send samples to Beltsville just to ease my mind and to be a safe and responsible beekeeper. Please do not ever poison any honeybees. Find an experienced beekeeper to help you out should you ever have a colony take up residence at your residence.
I did find the queen. She looks a lot like a Carniolan. There was not much brood or bees in the colony so she was easy to find. The pictures I have are really blurry so I will take a picture of her later and post it. But until then, here is a blurry picture of her.

After getting her and her colony home I gave them some new drawn comb to start on. I took only the minimum amount of brood comb from their nest due to the poisoning. I will rotate these frames to the outside of the hive and cull them out eventually. Even Though I am still awaiting the test results from Beltsville, I added some bees to the colony to help them become better established at their new location. Pictured below is a frame with some honeycomb and a couple pieces of brood comb. I made up one mere frame like this with a little more brood comb and less honey. I then either put the rest of the comb in the honey bucket or in the garbage bag.

Here is a picture of the wall after all the comb was removed.

The bees had built up into th wall an additional eight inches which made it a little more difficult to remove the comb and bees from there. This picture was taken looking up into the wall.

This was the first time that I lit up my smoker. I smoked the bees in this recess a whole lot. I smoked them enough so that they either fell out of the recess or took flight. The bees that fell were brushed into an empty butter bowl and dumped into the hive body. The bees which took flight went to the windows, toward the light, and were easily brushed off the top of the window into a butter bowl and then dumped into the hive body. After capturing all of the bees I sealed up the hive body with screen on the entrance, screen on the ventilation hole of the inner cover, and taped the inner cover to the hive body. wedges from a wedged top bar work really well to hold the screen in place and is easily removed. I must say it is much easier to use the and remove the wedges than it is to staple the screen on the entrance.
I do believe that above the top plate of the wall, in the previous picture, that the colony had moved up above it to build a new brood nest due to the fact that the lower area had been poisoned. I would have had to remove the ceiling and another ceiling above that tho gain access to this area. This was an extra expense the homeowner did not wish to incur. I could here bees buzzing in the wall above where I removed the honey comb and brood nest. If there is eggs or larvae of the appropriate age above the top plate the remaining bees can make a new queen and will continue to live in the wall. I informed the homeowner of the possibility of this occurring and agreed to come back and trap the bees out if this happens. I told her to wait a month to see if the bees were still there. If I was just hearing some stragglers buzzing chances are they will go find another hive to join or they will die alone.

All that was left to do was to clean the area and then reinstall the trim and paneling.

Here is a picture of the wall after everything was cleaned and put back into place.

You can't even tell that I had been there when the job was done. Performing a colony extraction from inside of a house or building is easily done if you are prepared and have some skills as a carpenter. Using plastic on the floor helps to keep honey and debris from embedding into the carpet fiber. Also sealing up the plastic really well along all the seams and edges will keep the bees out of the rest of the house. Be sure to have a shop vac, or a bee vac, on hand to capture all the stragglers which you couldn't put into the hive body before taking down the containment tent.
I hope this helps any of you who may be considering performing a colony extraction from inside of a house or other structure. Also, if you have bees in your house please do not poison them. Contact someone qualified to remove them for you. If you would happen to get lucky and kill them with poison, which is doubtful, the honey wax will melt and honey will drip down the inside of your walls and seep out into your carpet. You'll most likely never be able to get rid of the ants and other insects that will move in when the find the honey. Also if you spray poison on them most beekeepers will not remove the bees for you or will charge twice as much if they do. I doubt very seriously if I would have removed these bees if I would have known that they had been poisoned. When sprayed with insecticide, the honey is not fit for human consumption and the wax can not be utilized for beekeeping.
Thursday, January 24, 2008
Colony Extraction from May, 2007
I'm sure that if you are keeping bees that you would like to have more colonies, right? Of course you do. I don't think I've ever met a beekeeper who would turn down a free swarm if it was presented to them. I'm sure that if you are like me that you already have empty equipment sitting around begging you for bees. The easiest way to get bees without effecting your own colonies by making splits is to collect swarms. If you want to collect swarms you need to get your name out there now!!! Inform your local pest control businesses, real estate agents, landscapers, and tree trimmers that you would perform this service. The best thing is that there is no need to do it for free!!! Exterminators get paid for their services and all that I know will not poison bees. It is hard for a real estate agent to sell a house with a hive of bees under the eave. Landscapers are on a lot of different properties while they work and a busy hive isn't to hard to spot if it's around and is sometimes difficult to work around. Tree trimmers have a hard job to do if they are cutting down a tree that has a colony in or on it. They all will pay for your services or will recommend you to the property owner and they will pay to have their fears absolved by having you remove some bees. It is much easier to make a nuc or a split from one of your own colonies than it is to waste your gas and time running around trying to catch swarms that may have already left. You also don't want to cut out a colony with diseases or diseased brood for free when you don't want it anyway. This is the main reason you should be compensated for your efforts.
One of the big things about collecting swarms, removing bees, doing cutouts, or colony extractions is that you may inadvertently introduce a new pest or disease to your apiary. I collected a swarm while working near Carbo, VA a few years back and brought it home. The colony did great. I had no reason to suspect it had anything wrong with it. After I sent some samples to the Beltsville Bee Lab last Autumn I discovered this colony had tracheal mites. It had not infected my other colonies but the potential was there. Having a call about a swarm here in southern West Virginia is not common but having calls for doing colony extractions are.
Prior to doing the cutout you should asses the site and collect some samples to send to the Beltsville Bee Lab to have the sample diagnosed. After you get the results back you can decide what you need to do to the colony after you extract it. While you are cutting out the brood comb be sure to examine it closely for any brood disease. If you don't see any signs you should be alright. But if you see something out of the ordinary send it in for testing.
Here are some pictures from a colony extraction I did last May in the county east of here. The first picture is of me getting set up to look into the colony entrance.


After looking into the entrance and listening to the humm of the colony I was glad to discover the colony was in the wall on the front of the building and not on the side. This was a great relief as I did not wish to work off of the rickety extension ladder I had. Since the colony was in the front wall it made the work of removing it much easier as I could work off of the front porch on a step ladder.

After removing in the asphalt siding in a manner in which it could be reused I proceeded to cut the wall panels up the center of the stud so the could easily be nailed back into place. Pictured below is my first good look at the colony after I removed the planking from the wall.

After smoking the bees to move them to the comb deeper in the colony I started the slow tedious process of cutting the brood comb to fit some deep catch frames. I removed my gloves while doing this. Manual dexterity is of utmost importance when cutting out comb. I only got stung six times during the entire time and was all my fault because I put my hand or fingers on a bee. The bees were very docile which relieved my anxiety of possibly getting stuck like a pincushion.

Here I am coming down the ladder with a deep catch frame full of brood to put into a deep hive body.


Here's nice picture of a swarm catch frame partially filled with brood comb. You can see where I have removed about half of the comb from the wall at this point and there are still a bunch of bees in the wall.

At this point during the cutout I discovered the colony was making swarm preparations. This was evident by the presence of two swarm cells which were uncapped and still under construction. If I would have waited a week later I would have lost the mated feral queen and half of the bees in a swarm. The swarm cells were later used to make some nucs.


There was a lot of brood in the colony. If I remember correctly I made up eight frames of nothing but brood during the cutout.


This is a picture of the piece of comb I cut out that had the queen on it. The five gallon bucket in the background is where I put all the honey comb. It was nearly full when I finished.

Here's a closeup of the queen. It looks as if she was slimming down to fly off with the swarm within the next couple of weeks.

One thing that excited me about these bees was how quickly they started to remove damaged larva from the comb and hive after I put the comb into the deep hive body. This is indicative of hygienic behavior and was confirmed later when I tested them for hygienic behavior.

It took about five or six hours to remove all the comb from the wall and another two hours to remove and reinstall the sheeting and siding on the wall.

After a little more scraping of burr comb and removal of straggling bees I fixed the wall back to original condition. Too bad my photographer was in cleanup mode and forgot all about taking some additional pictures when I was done. I took all the bees I could and waited until after dark to make sure that I did. I feel sorry for the bees that got left behind but seeing how they were old enough to be foragers they didn't have much longer to live anyway.
I monitored the progress of this colony closely over the rest of the Summer and and it did not take them long to repair what I damaged. This picture was taken about two weeks later.

This next picture is what the upper deep looked like on the colony before winter. I was also fortunate to have this colony make a super of honey which I gave to a weaker colony for the winter.

This picture is of the winter cluster as of January 6, 2008. You can see that the colony only has three of the catch frames left in it because I used the rest for the split that I transferred the queen cells into. That split was later divided and the colonies that resulted are overwintering well so far. You can see in the picture that I used nine frame space frame rests in the hive body. This helps to hold the frames together until they are propolised and eliminates the need to use rubber bands or tie the ends of the top bars together. As of January 6th the bees had not moved into the upper deep and it is still full of winter stores.

If you are interested in doing any cutouts and would like some swarm catch frames feel free to contact me at my email address; ccohenour@hotmail.com
Also, if you are in southern or central West Virginia or near the state line around the area and have a colony you need removed from your property please feel free to contact me as well.
I have a few colony extractions scheduled for the later half of May. Hopefully I'll be able to take some pictures of those as well and post them here for you. If you are doing a cutout on your own just be sure to take plenty of beekeeping equipment, tools, take your time, and be careful. I hope you have enjoyed this. Happy Beekeeping!!!
One of the big things about collecting swarms, removing bees, doing cutouts, or colony extractions is that you may inadvertently introduce a new pest or disease to your apiary. I collected a swarm while working near Carbo, VA a few years back and brought it home. The colony did great. I had no reason to suspect it had anything wrong with it. After I sent some samples to the Beltsville Bee Lab last Autumn I discovered this colony had tracheal mites. It had not infected my other colonies but the potential was there. Having a call about a swarm here in southern West Virginia is not common but having calls for doing colony extractions are.
Prior to doing the cutout you should asses the site and collect some samples to send to the Beltsville Bee Lab to have the sample diagnosed. After you get the results back you can decide what you need to do to the colony after you extract it. While you are cutting out the brood comb be sure to examine it closely for any brood disease. If you don't see any signs you should be alright. But if you see something out of the ordinary send it in for testing.
Here are some pictures from a colony extraction I did last May in the county east of here. The first picture is of me getting set up to look into the colony entrance.


After looking into the entrance and listening to the humm of the colony I was glad to discover the colony was in the wall on the front of the building and not on the side. This was a great relief as I did not wish to work off of the rickety extension ladder I had. Since the colony was in the front wall it made the work of removing it much easier as I could work off of the front porch on a step ladder.

After removing in the asphalt siding in a manner in which it could be reused I proceeded to cut the wall panels up the center of the stud so the could easily be nailed back into place. Pictured below is my first good look at the colony after I removed the planking from the wall.

After smoking the bees to move them to the comb deeper in the colony I started the slow tedious process of cutting the brood comb to fit some deep catch frames. I removed my gloves while doing this. Manual dexterity is of utmost importance when cutting out comb. I only got stung six times during the entire time and was all my fault because I put my hand or fingers on a bee. The bees were very docile which relieved my anxiety of possibly getting stuck like a pincushion.

Here I am coming down the ladder with a deep catch frame full of brood to put into a deep hive body.


Here's nice picture of a swarm catch frame partially filled with brood comb. You can see where I have removed about half of the comb from the wall at this point and there are still a bunch of bees in the wall.

At this point during the cutout I discovered the colony was making swarm preparations. This was evident by the presence of two swarm cells which were uncapped and still under construction. If I would have waited a week later I would have lost the mated feral queen and half of the bees in a swarm. The swarm cells were later used to make some nucs.


There was a lot of brood in the colony. If I remember correctly I made up eight frames of nothing but brood during the cutout.


This is a picture of the piece of comb I cut out that had the queen on it. The five gallon bucket in the background is where I put all the honey comb. It was nearly full when I finished.

Here's a closeup of the queen. It looks as if she was slimming down to fly off with the swarm within the next couple of weeks.

One thing that excited me about these bees was how quickly they started to remove damaged larva from the comb and hive after I put the comb into the deep hive body. This is indicative of hygienic behavior and was confirmed later when I tested them for hygienic behavior.

It took about five or six hours to remove all the comb from the wall and another two hours to remove and reinstall the sheeting and siding on the wall.

After a little more scraping of burr comb and removal of straggling bees I fixed the wall back to original condition. Too bad my photographer was in cleanup mode and forgot all about taking some additional pictures when I was done. I took all the bees I could and waited until after dark to make sure that I did. I feel sorry for the bees that got left behind but seeing how they were old enough to be foragers they didn't have much longer to live anyway.
I monitored the progress of this colony closely over the rest of the Summer and and it did not take them long to repair what I damaged. This picture was taken about two weeks later.
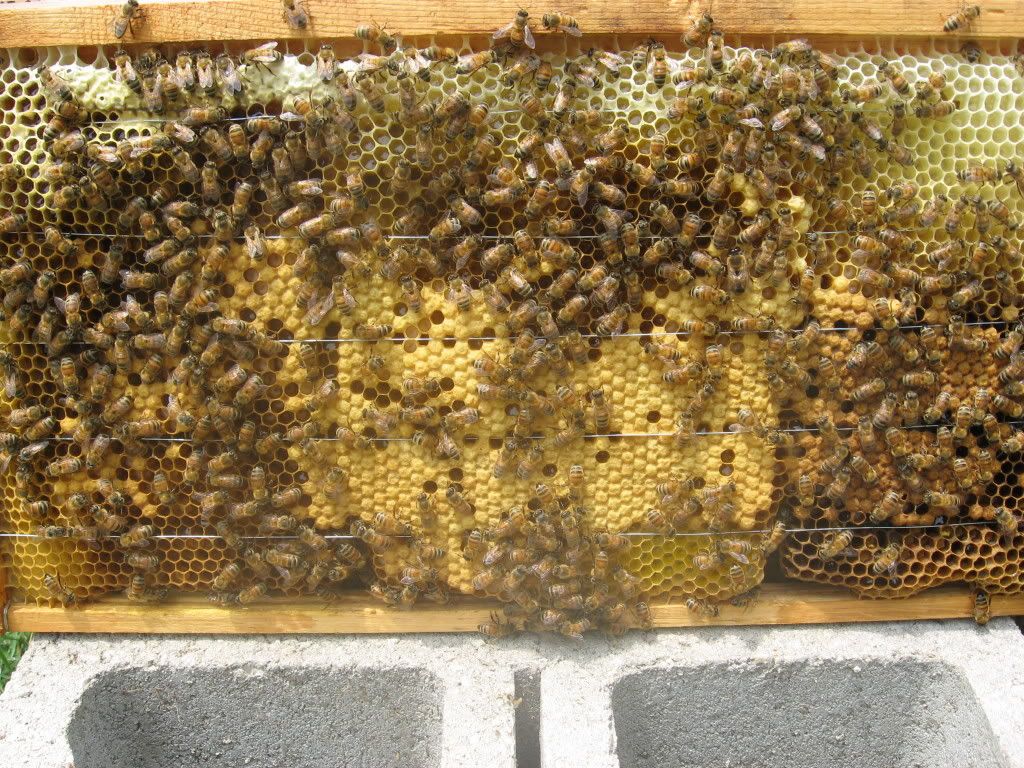
This next picture is what the upper deep looked like on the colony before winter. I was also fortunate to have this colony make a super of honey which I gave to a weaker colony for the winter.

This picture is of the winter cluster as of January 6, 2008. You can see that the colony only has three of the catch frames left in it because I used the rest for the split that I transferred the queen cells into. That split was later divided and the colonies that resulted are overwintering well so far. You can see in the picture that I used nine frame space frame rests in the hive body. This helps to hold the frames together until they are propolised and eliminates the need to use rubber bands or tie the ends of the top bars together. As of January 6th the bees had not moved into the upper deep and it is still full of winter stores.

If you are interested in doing any cutouts and would like some swarm catch frames feel free to contact me at my email address; ccohenour@hotmail.com
Also, if you are in southern or central West Virginia or near the state line around the area and have a colony you need removed from your property please feel free to contact me as well.
I have a few colony extractions scheduled for the later half of May. Hopefully I'll be able to take some pictures of those as well and post them here for you. If you are doing a cutout on your own just be sure to take plenty of beekeeping equipment, tools, take your time, and be careful. I hope you have enjoyed this. Happy Beekeeping!!!
Subscribe to:
Posts (Atom)